
Table of Contents
When to use Review
- After any bulk optimization run, to validate the plan before it reaches your TMS
- To compare alternate driver options for a trip that matters
- To evaluate the plan's profit, mileage, and service performance
- To understand why certain trips or drivers went uncovered
- To re-run optimization with different settings and compare the results
The Review module is only populated when you have completed a bulk optimization engine run.
To do this, see the related article: Bulk Optimization
How Review gets populated
Review is only populated when any sandbox plan exists. A plan is created by running a bulk optimization.
- After a bulk optimization finishes, Review can be opened automatically from the notification.
- You can also reach it any time from Planning > Review in the navigation panel.
- If no plan exists, Review will prompt you to start a bulk optimization.
Only one sandbox plan exists at a time. To start fresh, delete the current plan or run a new optimization.
For how to launch a run, see Bulk Optimization.
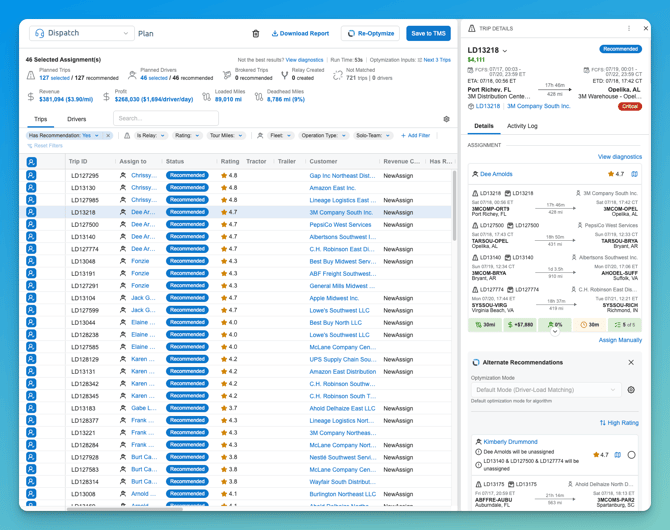
Navigation overview
Review has one header, one KPI bar, and two views of the same plan:
| Area | What it does |
|---|---|
| Header | Plan selection and the actions that create, replace, export, or commit the plan |
| KPI bar | Plan totals, and financial figures for whatever you have selected |
| Trips tab | One row per recommended trip |
| Drivers tab | The same plan as a driver timeline |
| Detail panel | Opens from either tab — the full recommendation, with alternates |
The Header
Plan selection
The dropdown at the top left selects which plan you're reviewing. Depending on your subscription, this may include Dispatch planning, Partial Load Consolidation, and LTL Load Consolidation.
Plan actions
| Action | What it does |
|---|---|
| 🗑 Delete plan | Discards the sandbox plan and opens the optimizer so you can start a new run. Nothing has been sent to your TMS, but any manual changes you made in Review are lost. |
| Download Report | Exports the plan and its performance figures for offline analysis. |
| Re-Optymize | Runs the engine again over the same work with updated settings, replacing the current plan. |
| Save to TMS | Commits the plan. Recommendations become real assignments, go to your TMS, and leave the Review sandbox. |
Save to TMS is the commit point. Review the plan fully before using it.
Run information
To the right of the KPI bar you'll find context about the run itself:
- View diagnostics — opens the explanation of what the engine couldn't cover
- Run Time — how long the optimization took
- Optymization Inputs — the Engine Mode that was used for this run
Checking the Engine Mode is worth doing before you judge a plan. The mode determines what the engine was allowed to do, whether relays were permitted, how far ahead it looked, and so on. A plan that looks disappointing is often a plan that was run under a restrictive mode.
Plan KPIs
The bar beneath the header summarizes the plan. The KPIs populate dynamically based on the recommendations you have selected.
Plan totals
These show for the whole plan, whether or not you've selected anything:
| Figure | What it means |
|---|---|
| Planned Trips | Trips that received a recommended driver |
| Planned Drivers | Drivers that received one or more recommended trips |
| Brokered Trips | Trips recommended for a third-party carrier rather than your own driver |
| Relay Created | Trips where the engine recommended a driver handoff |
| Not Matched | Trips and drivers the engine could not pair, shown as two separate counts |
Selecting assignments
Select assignments and the bar recalculates for your selection. Each total becomes a selected / recommended pair, and a second row of figures appears:
| Figure | What it means |
|---|---|
| Revenue | Total revenue for the selected assignments. The figure in brackets is revenue per total mile — loaded and empty miles combined. |
| Profit | Revenue less modeled cost, with average profit per driver per day in brackets |
| Loaded Miles | Revenue-generating miles |
| Deadhead Miles | Empty miles, with deadhead shown as a percentage of total miles |
Note on revenue per mile: the bracketed figure divides revenue by total miles, not loaded miles. If you're comparing it to a loaded-mile rate from elsewhere, the numbers will differ — this is expected.

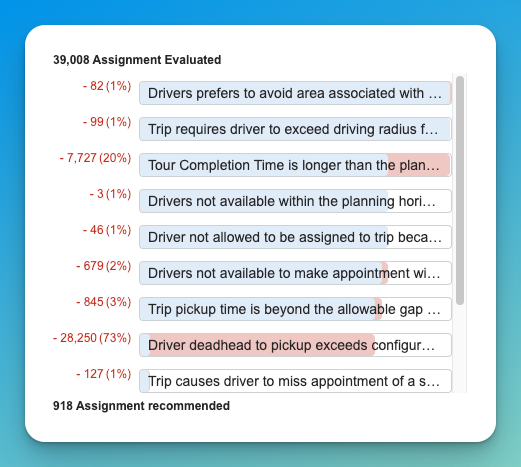
Diagnostics
View diagnostics explains why trips or drivers went uncovered. Each reason carries a percentage showing how often it blocked an assignment across the run.
Typical reasons include deadhead beyond the allowed threshold, a pickup time that falls outside the driver's available window, driver unavailability, and hours-of-service limits.
A large Not Matched count usually points to a constraint or a data problem rather than a shortcoming in the plan. Diagnostics is the fastest way to find out which.
Filtering the plan
A filter bar sits below the tabs, with a search box and a ⚙ icon for choosing which columns appear. Additional filters are available via the +Add Filter button. If you need an additional filter here please let your Customer Success Manager know.
| Filter | Use |
|---|---|
| Has Recommendation | Applied as Yes by default. Switch it off to look at work that went uncovered. |
| Is Relay | Show only recommendations involving a driver handoff |
| Rating | Filter by recommendation quality score |
| Tour Miles | Filter by total miles of the recommended tour |
| Fleet | Filter by driver fleet |
| Operation Type | Filter by driver operation type |
| Solo-Team | Solo or team drivers |
Filters apply to both tabs.
Trips tab
One row per recommended trip.
Where the engine has built a tour — several trips run back-to-back by one driver — each trip still appears as its own row, but selecting any one of them selects the whole tour. Tours are accepted or rejected together.
Columns
| Column | Description |
|---|---|
| Trip ID | The recommended trip. Click to open the detail panel. |
| Assign to | The driver the engine recommends |
| Status | Where the recommendation is in its lifecycle (see below) |
| Rating | Recommendation quality, scored out of 5 |
| Tractor / Trailer | Recommended equipment, where that data is available |
| Customer | Customer on the trip |
| Revenue Code | Your pricing agreement or business unit reference for the trip |
| Has Relay | Whether a driver handoff is involved |
| Deadhead % | Empty miles as a share of total miles |
| Loaded Miles | Revenue-generating miles |
| From City / To City | Trip origin and destination |
| Profit | Modeled profit. This can be negative. |
| Revenue per mile | Revenue rate for the trip |
| Trip Start Zone / Trip End Zone | Optimization zones for each end of the trip |
| Start Time / End Time | Planned start and finish, in local time |
Recommendation status
A recommendation isn't fixed — it moves through states as you work:
| Status | Meaning |
|---|---|
| Recommended | Proposed by the engine, not yet acted on. Every row starts here. |
| Pending Assignment | You've accepted it; it's queued to become an assignment. |
| Assigned | The pairing is an assignment. |
When you save the plan, assignments are pushed to your TMS and leave the Review sandbox.
Drivers tab
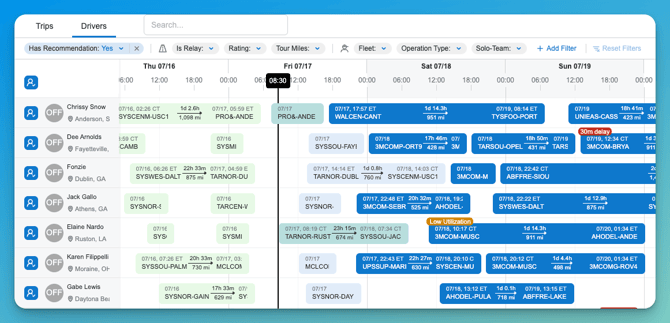
The same plan shown as a driver timeline — one row per driver across a multi-day view, with a vertical line marking the current time.
Each row shows the driver's name, availability, and location, followed by their work laid out in time order.
Timeline colors
Color tells you the state of each piece of work. This is the fastest way to see what a driver already has versus what this plan is proposing to add:
| Color | State |
|---|---|
| Green | Complete — the trip has finished |
| Blue-green | In progress — currently running |
| Light blue | Assigned — already committed to the driver |
| Royal blue | New recommendation — proposed by this run, not yet committed |
Badges
- Delay badges (red) flag projected lateness, with the amount of time
- Warning badges (orange) flag planning issues such as low utilization
Driver details
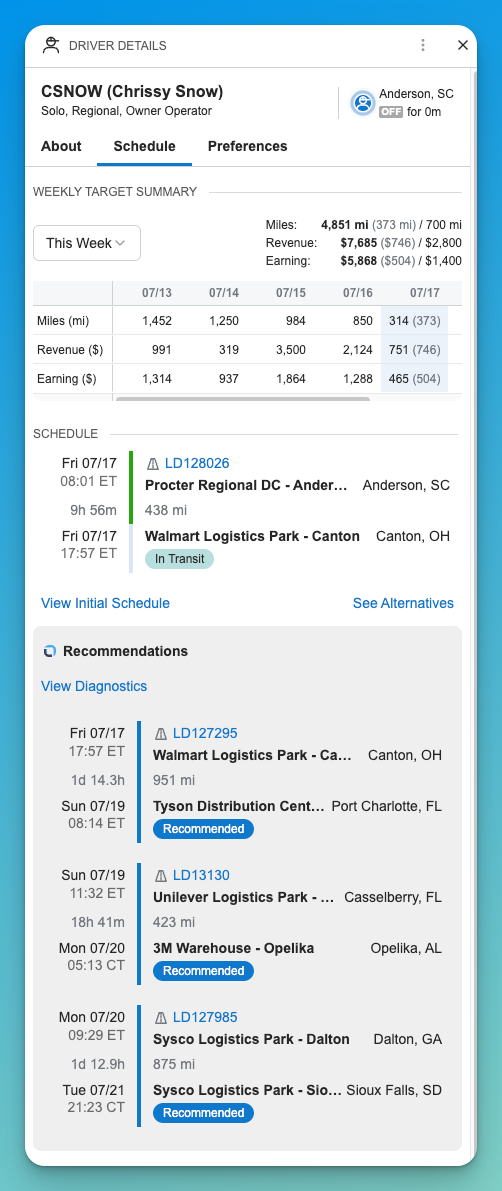
Select a driver to open their panel on the right. It shows:
- Driver summary — name, employment and operation type, current location and duty status
- Weekly targets — miles, revenue, and earnings progress against target, with a day-by-day breakdown
- Schedule — the work the driver already has and the Recommended trips. If there is any change in their current schedule you can also toggle the Initial Schedule to see the changes
- Recommendations — the trips this plan proposes adding, with times, locations, and mileage
Recommendation details
Click any trip to open the detail panel. This is where you evaluate a recommendation properly.
Header
The top of the panel shows the trip's profit, its appointment windows and estimated arrival and departure times, origin and destination, total distance and duration, the load and customer, and a priority badge where one applies.
The recommended tour
Below the header you'll see the full tour the recommendation implies — every leg the driver would run, not just the trip you clicked. Each leg shows its trip and load, the customer, departure and arrival times, locations, distance, and duration.
This matters: accepting a recommendation accepts the whole tour.
Tour summary metrics
Five figures summarize the tour:
| Metric | What it measures |
|---|---|
| Deadhead miles | Empty miles across the tour |
| Profit | Modeled profit for the tour |
| Wait time % | Time spent waiting as a share of total trip duration. This is a measure of how well the driver's available hours are being used for driving rather than sitting — it is not a mileage figure. |
| Delay | Projected lateness against appointments |
| Requirements met | How many of the five matching requirements this pairing satisfies |
The five matching requirements
The requirements met figure counts these:
- Equipment compatibility — the trailer type matches what the load requires
- Driver area preferences — the work falls in areas the driver prefers, and avoids those they don't
- Certifications — the driver holds the endorsements the load needs
- Shift preference — the work fits the driver's day or night preference
- Driver load matching rules — any matching rules you've configured
A pairing showing 4 of 5 is workable — it simply means one preference or rule wasn't satisfied. Open the detail to see which.
How the rating works
The Rating is scored out of 5. Each of the five tour metrics above contributes one point, scaled by how good that metric is for the pairing.
The score is deliberately balanced, so no single factor dominates. A recommendation with excellent profit but poor appointment adherence won't outrank a well-rounded one on rating alone.
If your priority this week is specific — covering deadhead, catching drivers up on miles, protecting service — don't rely on rating alone. Sort the alternates against that priority instead.
Alternate recommendations
Expand Alternate Recommendations to see other drivers who could take the trip. Each alternate shows the candidate, their rating, and the full tour they'd run.
Optimization mode
The mode selector at the top of the section controls the algorithm used to generate alternates. Changing it re-ranks the list.
Sorting alternates
Alternates are ranked by overall rating by default. Use the sort control to rank them against a single objective instead:
| Sort by | Ranks by | Check it against |
|---|---|---|
| High Rating | Overall balanced score | The star rating |
| High Profit | Most profitable tour | The profit figure |
| Low Deadhead Miles | Fewest empty miles | The deadhead figure |
| Low Delay Time | Best appointment adherence | The delay figure |
| High Requirements Met | Most matching requirements satisfied | The requirements figure |
| Early Assignment | Soonest the driver can start | The ETAs on each leg |
| High Tour Miles | Most total miles for the driver | The leg distances added together |
Sorting doesn't change any recommendation's rating — it only changes the order you see them in.
A High MIP Term option also appears in this menu. It's a troubleshooting aid used when investigating how the engine ranked candidates, and isn't needed for normal planning.
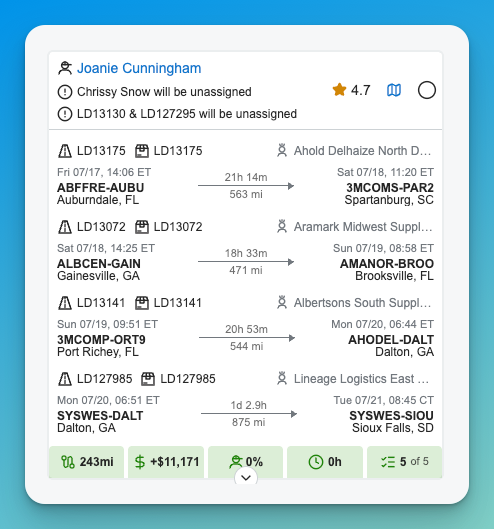
Understanding reassignment impact
Before you switch to an alternate, read the notices on the card.
Each alternate tells you what accepting it would undo — for example, that the currently recommended driver would be unassigned, or that other trips in the plan would be released.
Changing one recommendation is not a local change. Because the engine builds tours and balances work across the whole population, moving one trip to a different driver can unwind several other recommendations. The notices tell you exactly what would be affected before you commit to it.
Downloading the plan
Download Report exports the plan along with a set of performance figures covering mileage and utilization, revenue and profitability, load coverage, brokerage, critical freight, hours, and on-time performance. Figures are broken out by terminal, with an overall rollup.
The export is intended for offline and after-the-fact analysis. For working a plan, the on-screen figures are the ones to use.
Tips and best practices
- Check the Engine Mode first. It's shown in the header. It tells you what the engine was allowed to do, which often explains the plan you're looking at.
- Use Network Balance beforehand to decide which zones need attention before you run.
- Work the Not Matched count early. Diagnostics usually points to a constraint or a data problem you can fix and re-run, rather than something you need to plan around.
- Select assignments to scope the KPIs. The financial figures recalculate for whatever you've selected, so you can evaluate one fleet, one region, or one driver's worth of work in isolation.
- Read the impact notices before switching drivers. One swap can release several other recommendations.
- Compare runs. Try more than one Engine Mode and compare the results rather than accepting the first plan.
- Save to TMS last. It's the commit point, and assignments leave the sandbox at that moment.