
Table of Contents
- Key Use Cases
- Navigation Overview
- Engine Mode Types
- Mode Management
- How the Engine Uses a Mode
- Trip-Driver Matching Parameters
- When a Feasible Load Is Not Recommended
- Data Dictionary
Key Use Cases
- Tune optimization for different fleets or strategies: local, regional, dedicated or critical freight
- Prioritize cost, coverage, urgency or driver targets through scoring weights
- Turn features such as Drop & Hook, replanning and multi-trip tours on or off
- Limit deadhead, distance, tour length, gaps and lateness
- Penalize lateness, missed driver targets or unwanted freight instead of excluding it
Navigation Overview
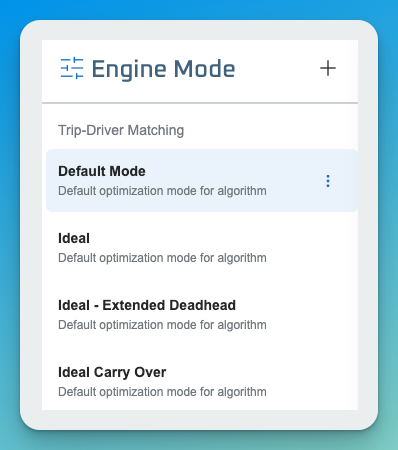
Open Engine > Engine Mode in the left menu. The middle panel lists modes grouped by algorithms your organization has enabled:
- Trip-Driver Matching
- LTL Consolidation (if enabled)
- Partial Consolidation (if enabled)
- Fuel Optimization (if enabled)
Select a mode to view its parameters on the right; choose Edit to change them. Use the ⋮ menu beside a mode name to duplicate or delete it.
Engine Mode Types
Trip-Driver Matching
Recommends single trips or multi-trip tours to drivers. Some examples of carriers modes can be targeting at specific outcomes:
- Next Trip Only: plan the best next trip for the selected drivers.
- Next Few Trips: plan a tour of up to 3 trips for the selected rivers
- Allow Replanning: plan the best trips which may also reshuffle assigned freight
- Default Mode: general-purpose logic for all driver types
Modes can also be built for critical freight (heavier priority incentives), dedicated fleets, or local drivers planned separately or together with other driver types. Other modes can be based on varying levels of flexibility:
Load Combination (See Load Consolidation Article)
LTL Consolidation groups LTL loads into a manifest using origin and destination pool points, with line-haul legs and implied first- and final-mile distribution.
Partial Consolidation combines 2–5 partial loads into one multi-stop truckload, with soft limits on commodity, region and stop count.
Fuel Optimization (See Fuel Optimization Article)
Holds the default settings for fuel route planning.
Mode Management
- Create a new mode: select +, choose the algorithm, and optionally copy parameters from an existing mode
- Edit: open a mode and select Edit
- Duplicate or delete: use the ⋮ menu beside the mode
Most fleets settle on 2 to 5 modes. A practical starting set:
|
Mode |
Purpose |
|---|---|
|
Default |
Everyday use; moderate rules, no relaxation |
|
Ideal |
Similar rules, 1-4 trip tours for strict planning |
|
Flexible |
Relaxed rules softened with penalties; run only when Ideal returns nothing |
You can also run modes in sequence (critical freight first with strict rules, then standard, then a flexible mode with wider deadhead) or vary them by day of week or specific fleet.
Check the selected mode before every run. LoadAi remembers the last mode used, so a run can silently use the wrong one. Many no-recommendation cases come from running an old mode after settings were changed in another.
How the Engine Uses a Mode
Every optimization run combines four things:
- Optimization type: single driver, single trip, or many-to-many (several drivers and trips solved together).
- Scope: the drivers and trips passed in, which you can narrow with board filters or by selecting specific drivers.
- Hard rules: limits such as tour duration, deadhead caps and trip delay. An option that breaks a hard rule is never generated, so it can never be recommended.
- Scoring: every option that survives the hard rules gets a score from revenue, incentives, costs and penalties. The highest-scoring options become recommendations.
The dollar values used in scoring are internal weights, not real money. The profit shown on a recommendation is always calculated from actual trip revenue, driver pay and fixed and variable costs. A setting such as a $5,000 critical-priority incentive only changes ranking; it never appears as profit.
Rule of thumb: use hard rules for what must never happen (i.e.deadhead over 250 miles or 10 hour delay) and use penalties for what you would rather avoid (i.e. Drivers being late to return home or missing weekly targets). A hard rule that is too tight silently removes good recommendations; a penalty keeps the option visible but ranks it lower.
Parameters fall into two groups. Scoring parameters (Trip Scoring, Driver Scoring, Cost Setting) decide how good an option is. Rule parameters (Planning Window, Tour Limits, Deadhead & Distance, Trip Delay, Time Off Delay, Drop & Hook, Replanning) decide which options are generated at all.
Trip-Driver Matching Parameters
Trip-Driver Matching – Trip Scoring
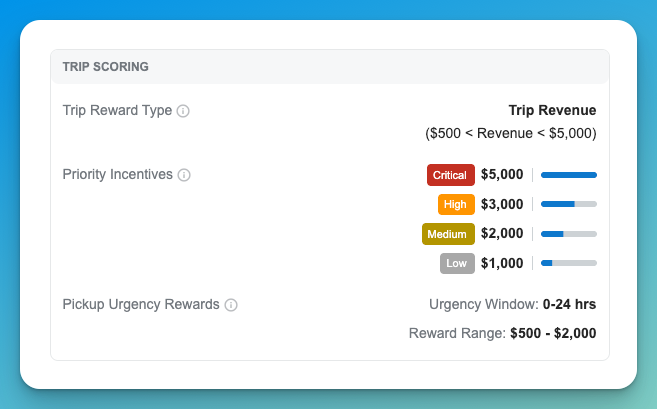
Trip Scoring sets the value the engine gives to covering a trip. A higher value makes the engine work harder to cover that trip.
|
Name |
Description |
Example Values |
|---|---|---|
|
Trip Reward Type |
Sets each trip's base value. Trip Revenue uses actual trip revenue ($1,000 load = 1,000 points). Per Loaded Mile uses miles × a $/mile value, for private fleets or dedicated freight with no real rate. Fixed Reward gives every trip the same value, so short trips are not passed over for long ones to try to cover all freight. |
Trip Revenue |
|
Range Floor and Cap |
Only for Trip Revenue and Loaded Mileage Trip Reward Types. Trips below the floor are scored as the floor, so cheap local runs still get covered; trips above the cap are scored as the cap, so one large load cannot pull drivers away from everything else. |
$500 < Revenue < $5,000 |
|
Priority Incentives |
Bonus added on top of the base value by load priority. Priority can be set per load, per customer, or by a rule (customer + pickup + delivery). Use it to protect key customers, especially with Fixed Reward. |
Critical $5,000, High $3,000, Medium $2,000, Low $1,000 |
|
Pickup Urgency Rewards |
Bonus for trips that pick up soon. It declines in a straight line across the window, from the top of the range at pickup-now to the bottom at the end of the window. It stops the engine from booking a profitable load three days out while today's freight is left behind. |
Window 0–24 hrs; $2,000 down to $500 |
When urgency and priority pull in different directions (an urgent low-priority load versus a later critical one), the engine balances the two and ranks both; the planner makes the final call. If one incentive dominates too often, lower it.
Trip-Driver Matching – Driver Scoring
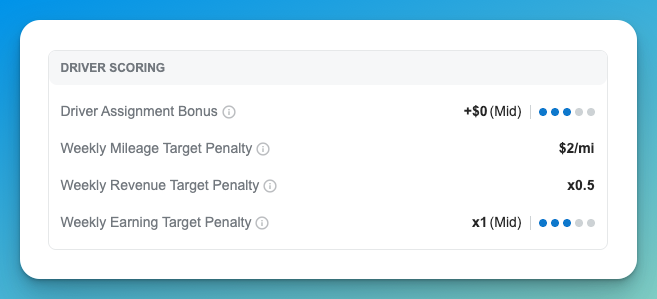
Driver Scoring adjusts an option's score based on how it spreads work across drivers and how close each driver gets to weekly targets.
|
Name |
Description |
Example Values |
|---|---|---|
|
Driver Assignment Bonus |
Points added (or subtracted) for every driver used in a plan. Positive spreads freight across more drivers; negative covers the same freight with fewer drivers; 0 is neutral. Applies to many-to-many optimization only. |
+$0 (Mid) |
|
Weekly Mileage Target Penalty |
Penalty per mile a driver ends the week short of their weekly mileage target. Example: 1,000-mile target, 800 planned, $2/mi = 200 × $2 = $400 penalty. No penalty once the target is met. |
$2/mi |
|
Weekly Revenue Target Penalty |
Multiplier applied to each dollar a driver falls short of their weekly revenue target (revenue of freight run). |
x0.5 |
|
Weekly Earning Target Penalty |
Multiplier applied to each dollar a driver falls short of their weekly earnings target (pay at their rate). |
x1 (Mid) |
Targets are weekly and set on each driver profile. Target penalties work in one-to-many runs too: when one trip can go to two drivers, the driver further behind target ranks higher. The recommendation card shows both the miles this trip adds and the driver's cumulative weekly total. Check that driver targets are realistic; a 700-mile default for regional drivers who run 1,500–2,200 miles a week makes these penalties meaningless.
Trip-Driver Matching – Cost Setting
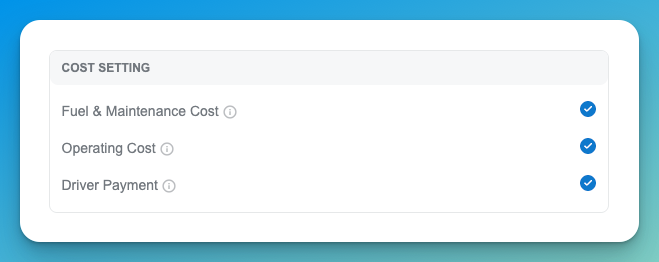
Cost Setting chooses which real costs are subtracted when the engine calculates an option's profit. All three are on by default.
|
Name |
Description |
|---|---|
|
Fuel & Maintenance Cost |
Variable cost per mile, loaded and empty. 500 deadhead miles cost more than 200. |
|
Operating Cost |
Fixed cost per hour, including waiting time. Waiting 10 hours for a 10-hour load costs 20 hours. |
|
Driver Payment |
Driver pay from each driver's pay profile. |
Turn a cost off only for a mode that should ignore it, for example a dedicated fleet where pay is fixed. Keep pay profiles and cost inputs current, since stale values skew every recommendation.
Trip-Driver Matching – Drop & Hook
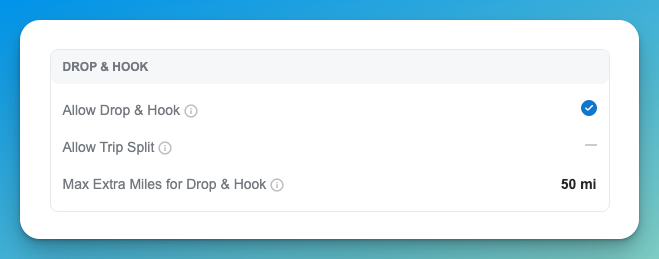
Drop & Hook (formerly Relay) lets the engine split one trip into two legs at a yard, so two drivers can share it. It is only recommended when it helps; the engine never splits loads just to split them.
|
Name |
Description |
Example Values |
|---|---|---|
|
Allow Drop & Hook |
Lets the engine split a trip into two legs at a relay yard. Driver 1 takes the first leg; the second leg stays on the board as an available trip. |
On |
|
Allow Trip Split |
Lets an already-split trip be split again (double relay), for example a local leg, a long-haul leg and a second local leg. |
Off |
|
Max Extra Miles for Drop & Hook |
Maximum out-of-route miles to reach the yard, counted round trip (50 mi = about 25 mi each way). Yards further off route are not considered. |
50 mi |
Relay points are limited to locations flagged as relay yards in Locations (bulk edit is available); the engine will not invent a meeting point. You can also block relays per customer or per load. Today the engine uses Drop & Hook mainly for low-utilization loads, where a driver would otherwise sit for days on a short load with a wide appointment window. It does not yet plan local–long-haul–local splits automatically or split an assigned load to get a driver home; plan those manually.
Trip-Driver Matching – Replanning
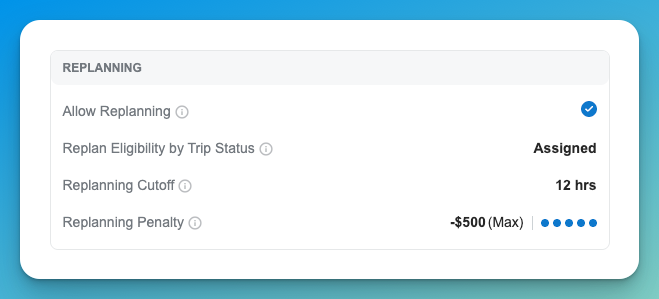
Replanning lets a many-to-many run reshuffle trips that are already planned, not just place available ones. When it is off, existing assignments are never touched.
|
Name |
Description |
Example Values |
|---|---|---|
|
Allow Replanning |
Master switch. Off means the engine only plans unassigned freight. |
Off |
|
Eligible Statuses |
Which statuses may be replanned: Assigned, Dispatched, and Brokered (pulls a brokered load back onto your own truck). Default is Assigned only. |
Assigned |
|
Replanning Cutoff |
Trips picking up within this many hours are locked. One cutoff applies to every eligible status. |
6–12 hrs |
|
Replanning Penalty |
How much better a replan must be before it is suggested, to cover the cost of calling the driver and changing plans. Presets: Low $200, Minimal −$100, Standard −$300. |
Minimal–Low |
Typical uses are a morning re-run to absorb overnight changes and recovering from a breakdown by re-optimizing a small, hand-picked set of nearby drivers. Start with a low penalty and raise it if the engine suggests too many swaps. Leave Brokered off unless you want to override broker decisions.
Trip-Driver Matching – Planning Window
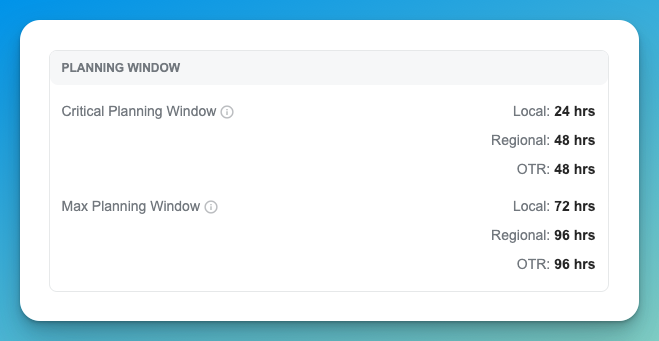
Planning Window sets how far ahead the engine looks when building a driver's tour. It is driver-centric; Pickup Urgency is the trip-centric counterpart. Each value can differ for Local, Regional and OTR drivers.
|
Name |
Description |
Example Values |
|---|---|---|
|
Critical Planning Window |
The near-term horizon the engine fills first. Work in this window is weighted as most important, so drivers get loaded soon before the engine worries about later days. |
48 hrs (all types) |
|
Max Planning Window |
The outer limit. Nothing is planned for a driver beyond this many hours from now. Must be equal to or greater than the critical window. |
Local 24 hrs; Regional up to 96 hrs |
Example: a regional driver with a 48-hour critical and 96-hour max window gets the next two days packed first, then day three and four if possible. Most fleets do not plan local drivers more than 24 hours out.
Trip-Driver Matching – Tour Limits
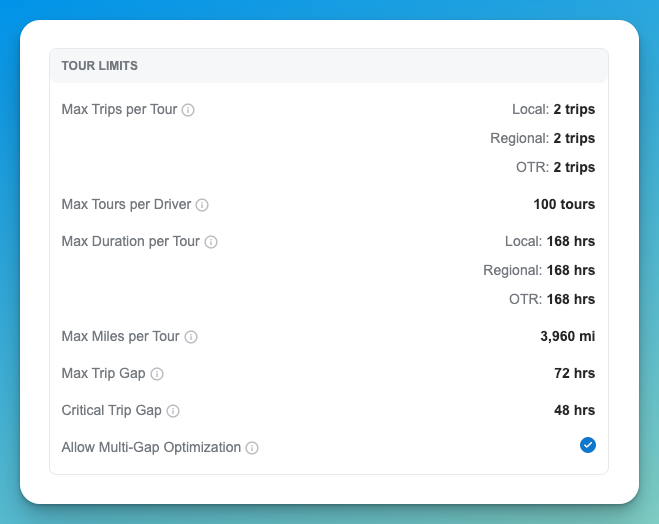
A tour is the sequence of trips (with gaps between them) the engine builds for one driver. Tour Limits are hard rules: a tour that breaks any of them is never generated.
|
Name |
Description |
Example Values |
|---|---|---|
|
Max Trips per Tour |
How many trips the engine chains into one recommendation. 1 = next trip only; 2 or more builds multi-trip tours that also position the driver well for later freight. |
Local, Regional, OTR: 1 trip |
|
Max Tours per Driver |
How many candidate tours the engine generates and scores per driver before choosing the best. Higher can find better options but runtime grows quickly. Rarely reached with 1-trip tours; consider raising it only for 3–4 trip tours. |
100 tours (up to 10,000) |
|
Max Duration per Tour |
Longest a tour may last, start to finish, in hours. Must fit your longest real runs plus weekends and resets. |
72 hrs each type |
|
Max Miles per Tour |
Most total miles (loaded + deadhead) in one tour. |
3,960 mi |
|
Max Trip Gap |
Longest layover allowed between the end of one trip and the start of the next in a tour. Confirmed time off is not counted, so a 34-hour reset does not use up the gap. |
72 hrs |
|
Critical Trip Gap |
Extra gap time allowed, on top of Max Trip Gap, when the next trip falls inside the driver's critical planning window. Set to 0 if you do not want gaps stretched for critical work. |
48 hrs |
|
Allow Multi-Gap Optimization |
When a planner clicks one gap on the timeline, On lets the engine also fill later gaps; Off recommends only for the gap clicked. |
Off |
Tour duration is the setting most often behind missing recommendations. A cap of 72 hours blocks a load whose tour runs into a weekend (for example a Thursday pickup with a Monday delivery); raising regional and OTR to 120 hours (5 days) fixes it. Because the planning window already confines tours, duration and miles can usually stay generous. Local drivers rarely need more than 24 hours.
Trip-Driver Matching – Deadhead & Distance
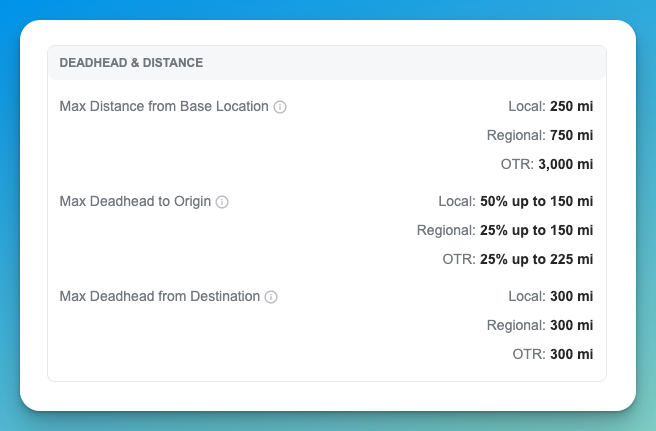
Deadhead & Distance rules limit empty miles and how far drivers stray from home. All three are hard rules, set separately for Local, Regional and OTR.
|
Name |
Description |
Example Values |
|---|---|---|
|
Max Distance from Base Location |
Furthest a trip may take a driver from their base (home or yard), in one-way miles. Local drivers must stay close enough to get home each day. |
Local 250 mi; Regional, OTR 3,000 mi |
|
Max Deadhead to Origin |
Empty miles allowed from where the driver frees up to the trip's pickup. Set as a percentage of the trip's loaded miles and a mile cap; the lower of the two applies. |
100% up to 300 mi |
|
Max Deadhead from Destination |
Empty miles allowed from this trip's delivery to the next trip's pickup in the same tour. Most fleets set it to match Deadhead to Origin. |
300 mi |
How the deadhead percentage and cap combine (100% up to 125 mi):
|
Next trip loaded miles |
50% of loaded miles |
Cap |
Deadhead allowed |
|---|---|---|---|
|
20 mi |
10 mi |
125 mi |
10 mi |
|
102 mi |
51 mi |
125 mi |
51 mi |
|
1,000 mi |
1,000 mi |
125 mi |
125 mi |
A low percentage cuts out short local runs: at 50%, a 20-mile load allows only 10 miles of deadhead. Use a high percentage and control long loads with the cap. Driver type matters here: a regional driver wrongly set as Local inherits the 250-mile radius and loses almost every recommendation. Run Show diagnostics on an empty result to see how many options each rule removed.
Trip-Driver Matching – Trip Delay
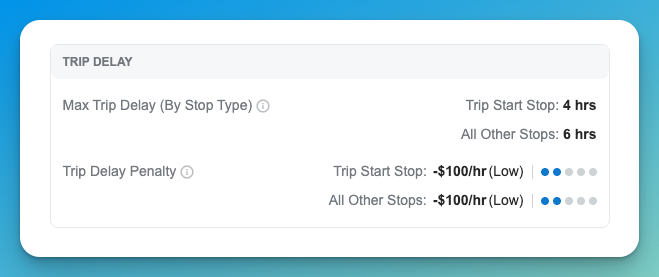
Trip Delay controls how the engine treats an option that would arrive after the appointment. Each setting pairs a hard limit with a per-hour penalty, set separately for the first stop and all later stops.
|
Name |
Description |
Example Values |
|---|---|---|
|
Max Trip Delay (By Stop Type) |
Latest the driver may arrive past the appointment, in hours. Options later than this are never generated, so the load disappears from recommendations. |
Trip Start Stop 4 hrs; All Other Stops 6 hrs |
|
Trip Delay Penalty |
Score deduction for every hour of lateness within the limit. A 48-hour-late option at $100/hr loses 4,800 points, so it still appears but ranks below on-time options. |
−$100/hr (Low) at each stop type |
If appointment data is not fully reliable, a tight Max Trip Delay hides freight that is already late or carries a stale appointment, and planners see no recommendation at all. Set the limit high (for example 48 hours) and let the penalty rank late options lower. Tighten it once appointment times in the TMS are dependable.
Trip-Driver Matching – Time Off Delay
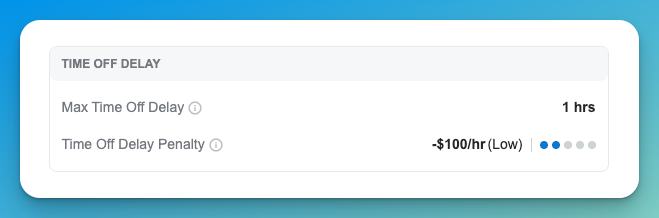
Time Off Delay controls how late a driver may start scheduled time off (home time) because of a planned trip.
|
Name |
Description |
Example Values |
|---|---|---|
|
Max Time Off Delay |
Latest a driver's time off may start past its scheduled time, in hours. Options that push home time later are never generated. |
1 hr |
|
Time Off Delay Penalty |
Score deduction per hour that time off is delayed, within the limit. |
−$100/hr (Low) |
A simpler approach is a penalty of 0 with flexibility set per driver instead: each driver's time-off preferences can carry their own buffer (for example ±4 or ±8 hours). Check that drivers have home time entered; a driver with none is treated as always available.
Trip-Driver Matching – Rule Relaxation
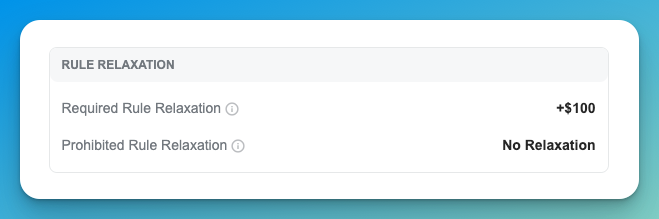
Rule relaxation turns required and prohibited automation rules (hard rules) into soft ones in bulk, with a penalty you set for breaking them. Rules that are already penalties, such as a $500 penalty on a customer's loads, are not affected. Keep relaxation off in your everyday mode and create a separate relaxed mode to run when the normal one returns nothing, for example to let expedite loads appear with a heavy penalty. If a rule is always relaxed, make it a penalty instead.
When a Feasible Load Is Not Recommended
Check these in order:
- Wrong mode selected: confirm the mode in the run is the one you edited.
- Load not in selected list or on hold: confirm load is in the data set and available
- Driver type: a regional driver set as Local gets local radius, deadhead and duration limits.
- Tour duration: a tour spanning a weekend can exceed Max Duration per Tour.
- Trip delay: a load already past its appointment or with an incorrect appointment can exceed Max Trip Delay.
- Driver profile: missing or wrong home time, weekly targets, or equipment limits (such as a low max weight).
- Diagnostics: use Show diagnostics to see which rule removed the most options.
Data Dictionary
|
Name |
Description |
Data Type |
|---|---|---|
|
Engine Mode Name |
Custom name for a saved configuration |
String |
|
Algorithm |
Trip-Driver Matching, LTL Consolidation, Partial Consolidation or Fuel Optimization |
Enum |
|
Trip Reward Type |
Base trip value: Trip Revenue, Per Mile or Fixed Reward |
Enum |
|
Revenue Floor / Cap |
Minimum and maximum revenue used for scoring |
Currency |
|
Priority Incentives |
Bonus per priority level (Critical, High, Medium, Low) |
Currency |
|
Pickup Urgency Window / Reward Range |
Hours ahead that earn an urgency bonus, and the bonus at the start and end of the window |
Number / Currency |
|
Driver Assignment Bonus |
Bonus (+) or penalty (−) per driver used in a many-to-many plan |
Currency |
|
Weekly Mileage Target Penalty |
Penalty per mile short of weekly mileage target |
Currency per mile |
|
Weekly Revenue / Earning Target Penalty |
Multiplier per dollar short of weekly revenue or earnings target |
Decimal |
|
Fuel & Maintenance Cost / Operating Cost / Driver Payment |
Cost components included in profit |
Boolean |
|
Allow Drop & Hook |
Allow splitting a trip at a relay yard |
Boolean |
|
Allow Trip Split |
Allow splitting an already-split trip |
Boolean |
|
Max Extra Miles for Drop & Hook |
Out-of-route miles allowed to reach a relay yard, round trip |
Number |
|
Allow Replanning |
Allow reshuffling planned trips in many-to-many runs |
Boolean |
|
Replanning Statuses / Cutoff / Penalty |
Eligible statuses, lock window before pickup (hrs) and minimum gain to suggest a replan |
Enum / Number / Currency |
|
Critical Planning Window |
Near-term hours filled first, by driver type |
Number |
|
Max Planning Window |
Furthest hours ahead planned, by driver type |
Number |
|
Max Trips per Tour |
Trips per recommendation, by driver type |
Integer |
|
Max Tours per Driver |
Candidate tours generated per driver |
Integer |
|
Max Duration per Tour |
Longest tour in hours, by driver type |
Number |
|
Max Miles per Tour |
Most loaded + empty miles in a tour |
Number |
|
Max Trip Gap |
Longest layover between trips in a tour (hrs) |
Number |
|
Critical Trip Gap |
Extra gap allowed inside the critical planning window (hrs) |
Number |
|
Allow Multi-Gap Optimization |
Fill later gaps when one gap is selected |
Boolean |
|
Max Distance from Base Location |
One-way miles from driver base, by driver type |
Number |
|
Max Deadhead to Origin |
Empty miles to pickup: % of loaded miles and mile cap, lower applies |
Ratio / Number |
|
Max Deadhead from Destination |
Empty miles from delivery to next pickup in a tour |
Number |
|
Max Trip Delay |
Hours late allowed, by stop type |
Number |
|
Trip Delay Penalty |
Score deduction per hour late, by stop type |
Currency per hour |
|
Max Time Off Delay |
Hours a driver's time off may start late |
Number |
|
Time Off Delay Penalty |
Score deduction per hour time off is delayed |
Currency per hour |
|
Rule Relaxation / Penalty |
Treat required and prohibited rules as soft, and the penalty for breaking one |
Boolean / Currency |